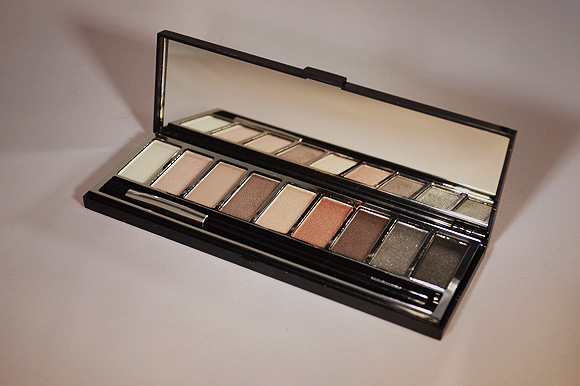
Stamattina ho pubblicato una review doppia su prodotti Pupa dove ti ho parlato della BB Cream+ Primer e della palette Pupart nella colorazione 001.
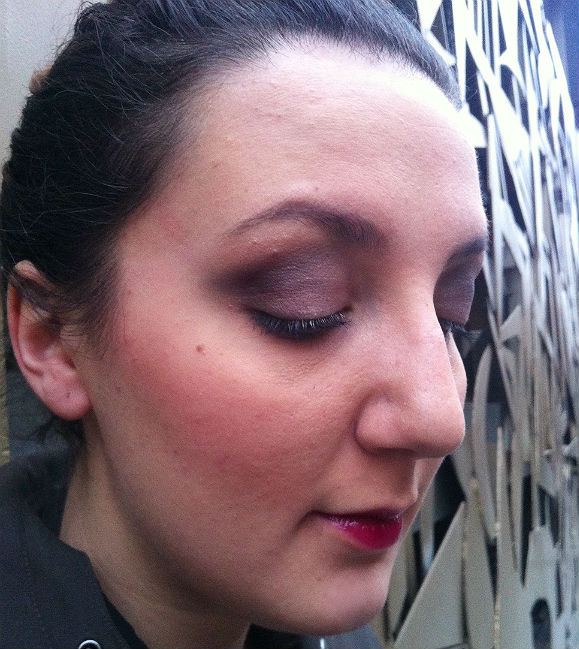
Per mostrarti un po’ meglio le sue capacità, ho pensato di mostrarti il look che proprio oggi indosso e che ho creato con questo prodotto.
Questo è un look decisamente carico per i miei standard: solitamente punto su eyeliner e mascara per il look da tutti i giorni ma ho essendo un’amante dei marroni mi è stato facile creare qualcosa di più sofisticato utilizzando solamente qualche colore in più.
Se sei curiosa di sapere come l’ho realizzato, ecco la descrizione step by step.
Today I posted a double review on some Pupa products: I talked about the BB Cream+ Primer and the Pupart palette in the shade 001.
To show you its potential, I decided to show you the look that I’m wearing and that I’ve created with this product.
This look is definitely dramatic for my taste: I usually prefer eyeliner and mascara for an everyday make up look; but since I love browns, it was easy for me to create something more sophisticated using just a bit more color.
If you want to know how I realized it, here’s the step-by-step process.
1) Dopo aver applicato la mia solita crema viso, ho steso la BB Cream + Primer nella colorazione 01.
Su occhiaie e brufoletti ho applicato un tocco di correttore e poi ho fissato tutto con la cipria preoccupandomi di essere generosa nell’area delle occhiaie.
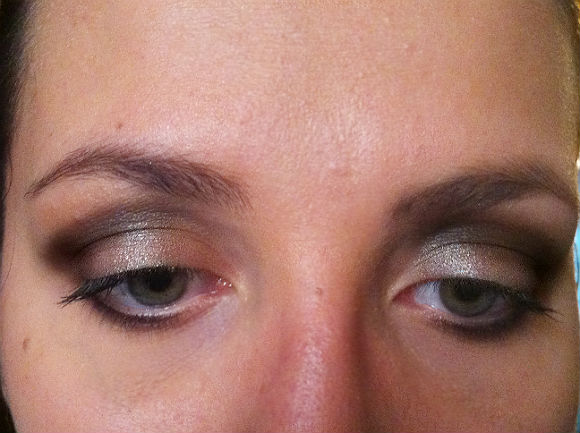
2) Iniziamo con gli occhi: ho applicato su tutta la palpebra mobile, con un pennello a lingua di gatto, un marrone taupe, in questo caso parlo della quarta colorazione della palette partendo da sinistra. Sono stata abbastanza generosa perché il colore è splendido e volevo un risultato intenso. Ne ho applicato un po’ anche all’attaccatura delle ciglia inferiori.
3) Per dare profondità allo sguardo, ho sfumato il verde/grigio (penultimo colore partendo da sinistra) su tutta la piega dell’occhio ad ampio raggio e, solo nella cavità, il marrone scuro che si trova subito prima dell’ombretto precedentemente usato.
Tocco finale? Un pizzico di nero nell’angolo esterno, farà la differenza!
1) After my usual moisturizer, I applied the BB Cream + Primer in the color 01.
On my undereye cirles and my pimples, I applied a bit of concealer; then I use some powder, especially under the eyes.
2) Let’s start with the eyes: with a flat shader brush, I applied a taupy brown color all over my lid (it’s the fourth color from the left). I was pretty generous since this color is so pretty and I wanted a dramatic effect. I used the same color on the bottom lashline as well.
3) To deepen up the look, I blended the green/grey (the second-last color from the left) all over my crease and I used the dark brown just in the outer corner (it’s the one that’s close to the green/grey).
The final touch? A bit of black in the outer corner, it will make a hugh difference!
4) E’ il momento di dare luce al trucco: ho utilizzato il terzo colore partendo da sinistra sull’arcata sopraccigliare e nell’angolo interno.
Con l’anulare ho prelevato un po’ del secondo colore, una via di mezzo fra uno champagne ed un dorato, applicandolo al centro dell’occhio per dare tridimensionalità.
5) Ho terminato il look occhi utilizzando solamente il mascara e tralasciando l’eyeliner: cosa c’è di meglio di una passata di Vamp! nel colore 100, cioè super black? E’ il mio preferito (e se avete letto la recensione sapete quanto lo amo!)
6) Prima di passare alle labbra: dopo una piccola spolverata di blush (ne ho utilizzato uno della collezione Very Vintage, per la precisione il numero 02!) ho creato un po’ di contouring utilizzando la Terra compatta abbronzante Multi Solare, nella tonalità 01, nella zona fra l’orecchio e il labbro creando una riga orizzontale e sfumandola bene.
4) It’s time to highlight my eye make up: I used the third color from the left on my brow bone and in the inner corner.
Using my ring finger, I took some of the second color – something in between a champagne and a gold color – and I put it in the middle of my lid, to give a 3D effect to the look.
5) I ended up with some mascara and not eyeliner: what’s better than a coat of the Vamp! mascara in number 100 – super black? It’s my favorite (if you read the review, you already know how much I love it!).
6) Before doing my lips: after a bit of blush (I used one from the Very Vintage collection, it’s number 02), I did some countouring with the Terra compatta abbronzante Multi Solare in the number 01, especially between my ear and my lips, creating an horizontal line that I blended really well.
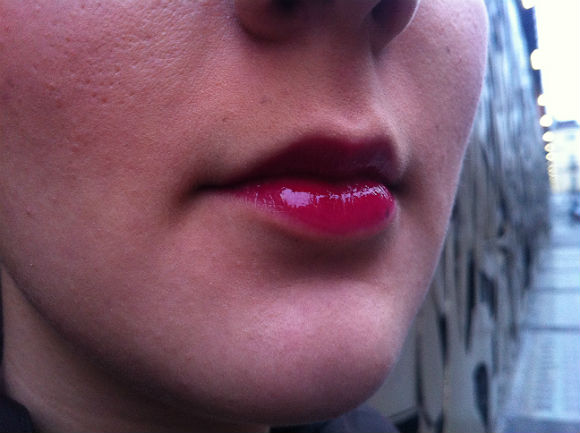
7) Ultimo step: le labbra. Non è da me utilizzare colori forti sia sugli occhi che sulle labbra (e credetemi, per me questo è un look già abbastanza carico!) ma ho deciso di fare un’eccezione. Via quindi ad un tocco di gloss: in questo caso è il Glossy Lips numero 404, una splendida tonalità fra il mattone e il bordeaux.
Sperando di esservi stata utile (e anzi, fatemi sapere se volete qualche altro tutorial!) vi abbraccio forte!
7) The last step: lips. I don’t usually like strong colors both on the eyes and on the lips (and believe me, for me this eye make up look is already pretty dramatic!), but I decided to get out of my comfort zone. So I used a gloss: it’s the Glossy Lips in number 404, a brick, burgundy color.
I hope you find this helpful, and let me know if you’d like some more tutorials! Hugs!